
Decision Trees with Kotlin
 It has been quite a while since my last post; things have been pretty busy in preparation for the launch of our new product VoodooDreams. Now that we have shipped our baby, I am super eager to try out Kotlin - a new programming language from JetBrains targeting the JVM. One interesting aspect about Kotlin (similar to Scala and other JVM-based languages) is that it treats functions as first class citizens (IMO Functional Interfaces just patch the gap). In order to try out this language we will create a Decision Tree Learning algorithm which is one of the most used and practical methods for learning inductive inference.
Learning as a Task
In order to ground our discussion, we will consider the example of learning the concept “Play Tennis”. Note that this example has been adapted from the book - Machine Learning by Tom Mitchell. The table below represents a list of positive and negative examples which we will use to induce a general function. This will be our training DataSet \(D\).
| Outlook | Temperature | Humidity | Wind | Play Tennis |
|---|---|---|---|---|
| Sunny | Hot | High | Weak | False |
| Sunny | Hot | High | Strong | False |
| Overcast | Hot | High | Weak | True |
| Rain | Mild | High | Weak | True |
| Rain | Cool | Normal | Weak | True |
| Rain | Cool | Normal | Strong | False |
| Overcast | Cool | Normal | Strong | True |
| Sunny | Mild | High | Weak | False |
| Sunny | Cool | Normal | Weak | True |
| Rain | Mild | Normal | Weak | True |
| Sunny | Mild | Normal | Strong | True |
| Overcast | Mild | High | Strong | True |
| Overcast | Hot | Normal | Weak | True |
| Rain | Mild | High | Strong | False |
The task here is to learn the Play Tennis concept from the attributes: Outlook, Temperature, Humidity and Wind. Each row in the table represents a hypothesis. We will represent this in Kotlin using the DataPoint class and use the Delegated Properties map feature.
data class DataPoint(val map: Map<String, Any?>, val result: Boolean? = null){
    val outlook:String by map
    val temperature: String by map
    val humidity: String by map
    val wind: String by map
}
The Delegated Property map feature (by map) allows us to store properties in a map whilst still allowing accessing them as properties. In the ID3 algorithm we will be using the map to train the algorithm whilst an end user can use the properties directly. Our training DataSet \(D\) can be represented as follows:
val D = listOf(
   DataPoint(mapOf("outlook" to "Sunny", "temperature" to "Hot", "humidity" to "High", "wind" to  "Weak"), false),
   DataPoint(mapOf("outlook" to "Sunny", "temperature" to "Hot", "humidity" to "High", "wind" to "Strong"), false),
   DataPoint(mapOf("outlook" to "Overcast", "temperature" to "Hot", "humidity" to "High", "wind" to "Weak"), true),
   DataPoint(mapOf("outlook" to "Rain", "temperature" to "Mild", "humidity" to "High", "wind" to "Weak"), true),
   DataPoint(mapOf("outlook" to "Rain", "temperature" to "Cool", "humidity" to "Normal", "wind" to "Weak"), true),
   DataPoint(mapOf("outlook" to "Rain", "temperature" to "Cool", "humidity" to "Normal", "wind" to "Strong"), false),
   DataPoint(mapOf("outlook" to "Overcast", "temperature" to "Cool", "humidity" to "Normal", "wind" to "Strong"), true),
   DataPoint(mapOf("outlook" to "Sunny", "temperature" to "Mild", "humidity" to "High", "wind" to "Weak"), false),
   DataPoint(mapOf("outlook" to "Sunny", "temperature" to "Cool", "humidity" to "Normal", "wind" to "Weak"), true),
   DataPoint(mapOf("outlook" to "Rain", "temperature" to "Mild", "humidity" to "Normal", "wind" to "Weak"), true),
   DataPoint(mapOf("outlook" to "Sunny", "temperature" to "Mild", "humidity" to "Normal", "wind" to "Strong"), true),
   DataPoint(mapOf("outlook" to "Overcast", "temperature" to "Mild", "humidity" to "High", "wind" to "Strong"), true),
   DataPoint(mapOf("outlook" to "Overcast", "temperature" to "Hot", "humidity" to "Normal", "wind" to "Weak"), true),
   DataPoint(mapOf("outlook" to "Rain", "temperature" to "Mild", "humidity" to "High", "wind" to "Strong"), false)
)
Decision Trees Representation
Having represented our DataSet we will now focus on how to represent the Decision Tree built by using the ID3 algorithm. This algorithm is but one in the family of Decision Tree Learning Algorithms; a family of algorithms which are great at approximating discrete-valued target functions. The output of the ID3 algorithm is a decision tree which can be represented visually as follows:
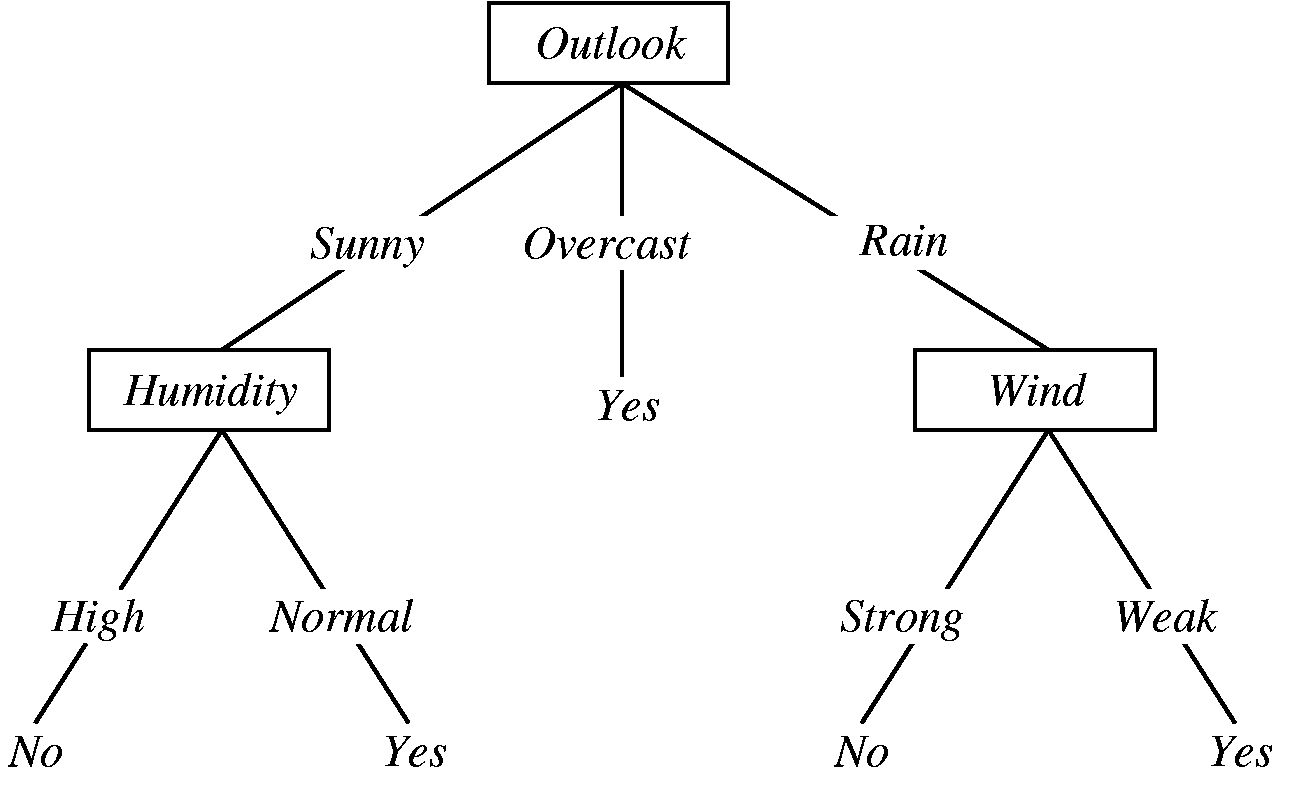
In order to classify (predict) a new instance, we will start off at the root of the tree, test the attribute specified and then move down the tree branch corresponding to the value of the attribute. This process is repeated until a leaf node is reached.
Let us follow with the example:
We will start off at the root of the tree which contains the attribute Outlook and move to the left subtree (since the value is Sunny). The remaining attributes which could be tested are:
The root of the left subtree requires us to check the Humidity attribute. Since the value of the attribute is High we will move to the left subtree to find the leaf node containing the result No. Hence we can infer that this is not a good day to play tennis (but a great time to read this article! :bowtie:).
In order to represent the following Tree in Kotlin we will make use of the Sealed Classes. From their documentation:
Sealed classes are used for representing restricted class hierarchies, when a value can have one of the types from a limited set, but cannot have any other type. They are, in a sense, an extension of enum classes: the set of values for an enum type is also restricted, but each enum constant exists only as a single instance, whereas a subclass of a sealed class can have multiple instances which can contain state.
sealed class Tree {
    class Node(val key: String, val children: Map<String, Tree>?) : Tree()
    class Leaf(val result: Boolean) : Tree()
}
The tree above would be represented as follows:
 Tree.Node("Outlook", mapOf(
         Pair("Sunny", Tree.Node("Humidity", mapOf(
                 Pair("High", Tree.Leaf(false)),
                 Pair("Normal", Tree.Leaf(true))
         ))),
         Pair("Overcast", Tree.Leaf(true)),
         Pair("Rain", Tree.Node("Wind", mapOf(
                 Pair("Strong", Tree.Leaf(false)),
                 Pair("Weak", Tree.Leaf(true))

         )))
 ))
Note that we could have also represented this as a disjunction of conjunctions. If you are interested you can try it out - depth traversal algorithm comes to mind).
\[\begin{eqnarray} (Outlook = Sunny \wedge Humidity = Normal) \vee \nonumber \newline (Outlook = Overcast) \vee \nonumber \newline (Outlook = Rain \wedge Wind = Weak) \end{eqnarray}\]Classifying New Exemplars.
The advantage of using a sealed class is that it will make the implementation of the classify function more succinct. When paired with the When Expression feature, sealed classes give us rudimentary pattern matching capabilities . It would be great to see proper pattern matching support in the coming Kotlin releases. The implementation of the classify function is as follows:
class ID3() {
    companion object {
        fun classify(dataPoint: DataPoint, tree: Tree): Boolean = when (tree) {
            is Tree.Leaf -> tree.result
            is Tree.Node -> {
                val value = dataPoint.map[tree.key]
                val subtree = tree.children?.get(value)!!
                classify(dataPoint, subtree)
            }
        }
    }
}
Note that we are using the Companion Object feature of Kotlin. If you have never seen Companion objects before you can think of them as public static methods on the ID3 class. Another feature which we are using is the Smart Cast feature. This feature will automatically type cast a variable after using the is checks. In this case after the is Tree.Leaf expression evaluates to true, tree will automatically be cast to Tree.Leaf.
Building the Tree
Now that we have represented our decision tree and learnt how to classify new exemplars, let us take on the task of building a tree from the example data. The most important question to ask when building a decision tree is “Which Attribute Is the Best Classifier?”. What we would like to determine is which attribute is the best attribute to classify items at a certain level in the tree, or better, which item gives us the best information gain.
Entropy
In order to determine information gain we start off by looking at entropy which measures the (im)purity of an arbitrary collection of examples. Given a collection of elements \(S\) containing only positive and negative items, entropy is measured by:
\[ Entropy(S) = -p_{\oplus} log_{2} p_{\oplus} - p_{\ominus} log_{2}p_{\ominus} \]
An intuitive way in which we can think about entropy is a number (\([0,1]\)) which represents the minimum number of bits of information needed to encode the classification of an arbitrary member of \(S\). If the collection \(S\) does not have any positive or negative examples the entropy will be 0. If I pick an item at random from the collection \(S\) and all items are from the same class then the item I picked must be from that class hence we need 0 bits to encode this information. If the distribution of samples is equal, then the entropy is 1. This means that we need at minimum 1 bit to represent a randomly picked item from \(S\). We could encode a positive sample as 1 and a negative sample as 0. As an example, if we have 9 positive examples and 5 negative examples the entropy would be:
\[Entropy([9+, 5-]) = -\frac{9}{14}log_{2}\Big(\frac{9}{14}\Big) -\frac{5}{14}log_{2}\Big(\frac{5}{14}\Big) = 0.940\]We can extend this formula of Entropy to multiple attributes (rather than just true and false) as follows:
\[Entropy(S) = \sum_{i=1}^{c} -p_{i}log_{2}p_{i}\]where \(p_{i}\) is the proportion of \(S\) belonging to class \(i\).
In Kotlin we can express entropy as follows:
fun entropy(positive: Double, negative: Double, total: Double = positive + negative):Double {
  fun log2(valueA: Double, valueB: Double) = if (valueA == 0.0) 1.0 else Math.log(valueA / (valueA + valueB)) / Math.log(2.0)
  return -(positive / total * log2(positive, negative) + negative / total * log2(negative, positive))
}
Information Gain
Now that we have defined Entropy as an (im)purity measure, we can answer the question “Which Attribute Is The Best Classifier?”. This measure is called Information Gain - you can think of this value as the expected reduction in entropy or the expected number of bits saved if we had to encode the classification using the particular attribute. The Information Gain of an attribute \(A\) is defined as:
\[Gain(S, A) = Entropy(S) - \sum_{v \in Values(A)} \frac{|S_{v}|}{|S|}Entropy(S_{v})\]To understand what we need to do, lets work out the Information Gain of attribute \(Wind\) for the dataset \(S\) i.e. \(Gain(S, Wind)\). Note that there are 14 examples in our dataset; 9 positive, 5 negative \([9+ 5-]\). There are 2 values for the attribute Wind: Weak and Strong. Weak has 6 positive examples and 2 negative examples \([6+, 2-]\). Strong has 3 positive examples and 3 negative examples \([3+, 3-]\).
\[\begin{eqnarray} Gain(S, A) &=& Entropy(S) - \sum_{v \in \\{Weak, Strong\\} } \frac{|S_{v}|}{|S|}Entropy(S_{v}) \nonumber \newline &=& Entropy(S) - \frac{8}{14}Entropy(S_{Weak}) - \frac{6}{14}Entropy(S_{Strong}) \nonumber \newline &=& 0.940 - \frac{8}{14}0.811 - \frac{6}{14}1.0 \nonumber \newline &=& 0.048 \end{eqnarray}\]In Kotlin the Gain can be implemented as follows:
fun gain(dataPoints: List<DataPoint>, extractor: (DataPoint) -> Pair<String, Boolean>): Double {
    val (positive, negative) = dataPoints.map { extractor(it) }.partition { it.second }
    val attributes = dataPoints.map { extractor(it) }
        .groupBy { it.first }
        .map {
            val (positiveSv, negativeSv) = it.value.partition { it.second }
            Triple(it.key, positiveSv.size.toDouble(), negativeSv.size.toDouble())
        }
    return (entropy(positive.size.toDouble(), negative.size.toDouble())
            + attributes.map({ -entropy(it.second, it.third, dataPoints.size.toDouble()) }).sum())

}
We can compute the Gain of the attribute Wind as follows:
gain(dataPoints, { Pair(it.wind, it.result!!) })
The extractor function defined as
extractor: (DataPoint) -> Pair<String, Boolean>
is a function which will be called on the dataset \(S\) to extract the information required - the value of the wind property and the classification result. The !! is an indication to Kotlin that we are 100% sure that this property will not be null.
ID3 Tree
Now that we have all the pieces of our puzzle ready, we will write the build function which will create the ID3 Tree. To understand what is going on, I will use a literate programming approach. Below you will find the listing of the build function.
 fun build(dataPoints: List<DataPoint>): Tree {
    val (positive, negative) = dataPoints.partition { it.result!! }
    if (positive.size == 0) return Tree.Leaf(false)
    if (negative.size == 0) return Tree.Leaf(true)
    val attributes = dataPoints.map { it.map.keys }.flatMap { it }.distinct()
    if (attributes.size == 1) {
        return if (dataPoints.count { it.result!! } > dataPoints.count { !it.result!! }) Tree.Leaf(true) else Tree.Leaf(false)
    } else {
        val (attribute) = attributes.map { attr ->
            Pair(attr,
                gain(dataPoints, { Pair(it.map[attr].toString(), it.result!!) })
            )
        }.sortedByDescending { it.second }.first()

        val remaining = dataPoints.groupBy { it.map[attribute] }
        val filteredRemaining = remaining.entries.map {
            entry ->
            Pair(entry.key, entry.value.map { dataPoint ->
                DataPoint(dataPoint.map.filterKeys { it != attribute }, dataPoint.result)
            })
        }

        val children = filteredRemaining.map { Pair(it.first.toString(), build(it.second)) }.toMap();
        return Tree.Node(attribute, children)
    }
}
Some explanations are due.
Starting off, we determine whether the DataSet is made up of all positive or all negative sample points (Entropy 0):
val (positive, negative) = dataPoints.partition { it.result!! }
if (positive.size == 0) return Tree.Leaf(false)
if (negative.size == 0) return Tree.Leaf(true)
It such a case we return a Tree.Leaf with the corresponding result.
Next we will check how many attributes there are in the DataSet:
val attributes = dataPoints.map { it.map.keys }.flatMap { it }.distinct()
If there is only one attribute, then the most common value of the target attribute is returned.
if (attributes.size == 1) {
    return if (dataPoints.count { it.result!! } > dataPoints.count { !it.result!! })
        Tree.Leaf(true) else Tree.Leaf(false)
}
Otherwise, we will first determine “Which attribute is the best?” by working the Information Gain of each attribute and retrieve the one with the highest Information Gain:
val (attribute) = attributes.map { attr ->
    Pair(attr,
        gain(dataPoints, { Pair(it.map[attr].toString(), it.result!!) })
    )
}.sortedByDescending { it.second }.first()
For all the values of the chosen attribute:
val remaining = dataPoints.groupBy { it.map[attribute] }
we will add a new subtree below the parent node and select the DataSet subset such that the attribute \(A\) in the parent subset matches the value \(v_{i}\).
val filteredRemaining = remaining.entries.map {
    entry ->
    Pair(entry.key, entry.value.map { dataPoint ->
        DataPoint(dataPoint.map.filterKeys { it != attribute }, dataPoint.result)
    })
}
In this case the attribute which has the highest Information Gain is the Outlook attribute. Since Outlook has three values we will create three subtrees: one for Sunny, one for Overcast and one for Rain. The Sunny Subtree should filter out all data points whose Overcast attribute value is not Sunny. In this case this subtree will have 5 data points; 2 positive examples and 3 negative examples \([2+,3-]\):
| Outlook | Temperature | Humidity | Wind | Play Tennis |
|---|---|---|---|---|
| Sunny | Hot | High | Weak | False |
| Sunny | Hot | High | Strong | False |
| Sunny | Mild | High | Weak | False |
| Sunny | Cool | Normal | Weak | True |
| Sunny | Mild | Normal | Strong | True |
Finally we will call the build function recursively on this DataSet subset.
val children = filteredRemaining.map { Pair(it.first.toString(), build(it.second)) }.toMap();
return Tree.Node(attribute, children)
Note that it.first will contain the attribute value (e.g. Sunny) whilst the it.second contains the DataSet subset.
Conclusion
In this post we have looked at some of Kotlin’s key features and we have used these to build an ID3 decision tree. If you are further interested in learning about Kotlin I’d suggest you have a look at the reference guide. If you are interested in learn more about Decision Tree Learning consider buying the book linked above. It is an absolute classic! Stay safe and keep hacking!